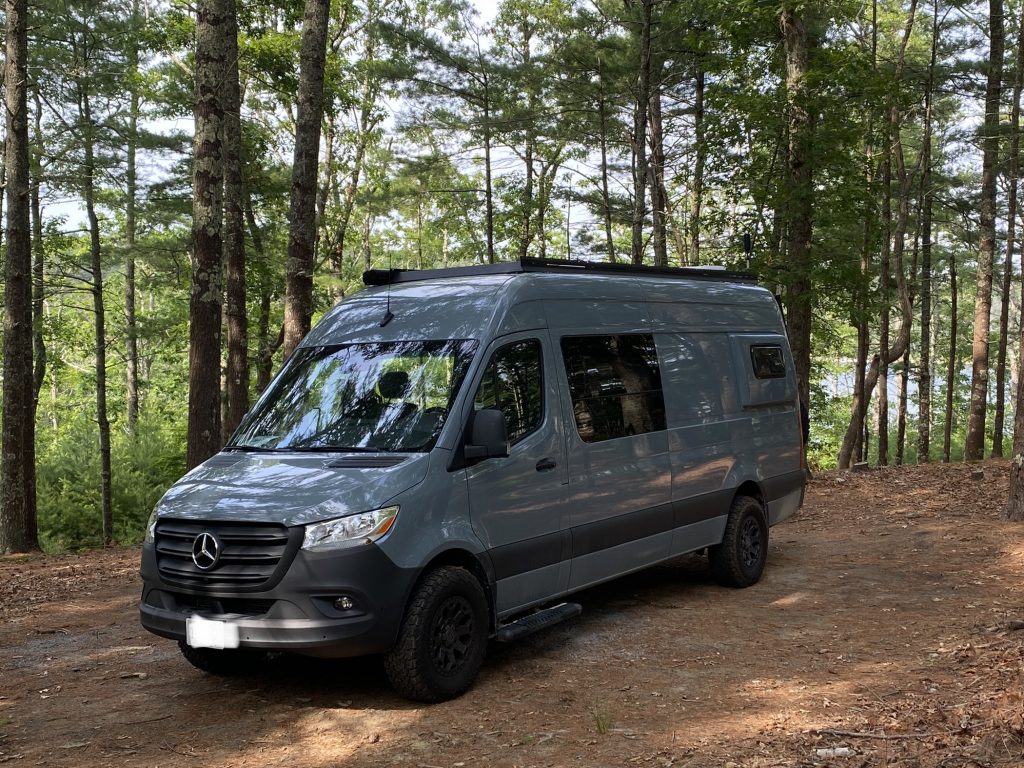
Despite being personal finance enthusiasts on a path to financial independence, we did NOT do a budget campervan build.
We are strong believers in intentional spending. This means that we are happy to splurge on the things that will add value and joy to our lives. And, we cut costs on the things that don’t.
The vision that we have for our ideal life includes:
- Travel and adventure
- Time spent outdoors appreciating natural beauty
- Quality time together and with friends and family
Given these values, we knew that building a campervan that could be our adventure mobile for years to come would help us to achieve this vision.
As much as we enjoyed tent camping, we want to be able to explore while also having:
- A comfortable bed
- Space to relax and hang out (especially if it rains)
- A temperature-controlled environment
- What we need to cook healthy, tasty meals
- A shower and toilet, so we didn’t need to worry about staying in places that had these amenities
- Space and connectivity to work from the van.
In this installment of our vanlife series, we will share more about the layout and features of our campervan. We will also answer a bunch of reader questions!
If you are curious about why we chose a campervan in the first place, I’d encourage you to check out the first installment of our series. In that post, we share more about why we chose vanlife over other types of travel or RV options.
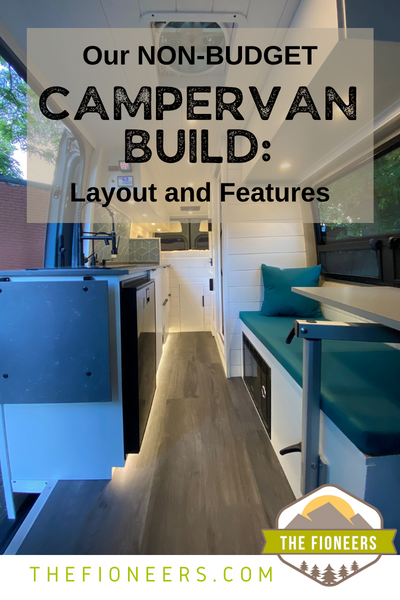
What Features Does Your Campervan Include?
We spent several months (years, if you count all the vanlife youtube videos we’ve watched) planning the layout for our campervan.
Ultimately, we decided to go with a layout that includes:
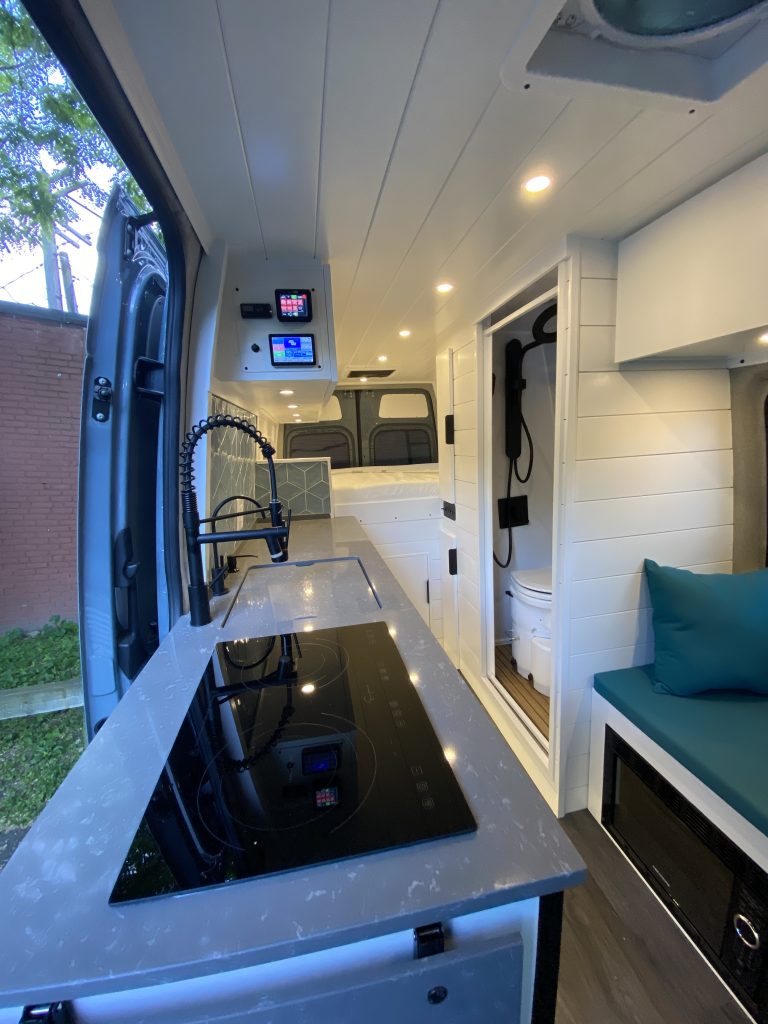
- A fixed bed in the back of the van
- A galley kitchen on the passenger side in front of the bed
- A bathroom on the driver’s side with a shower and compost toilet
- A bench with a movable table for eating, working and hanging out.
- Plenty of storage for clothes, food, gear, and games.
Let’s discuss why we chose each of these features and go deeper.
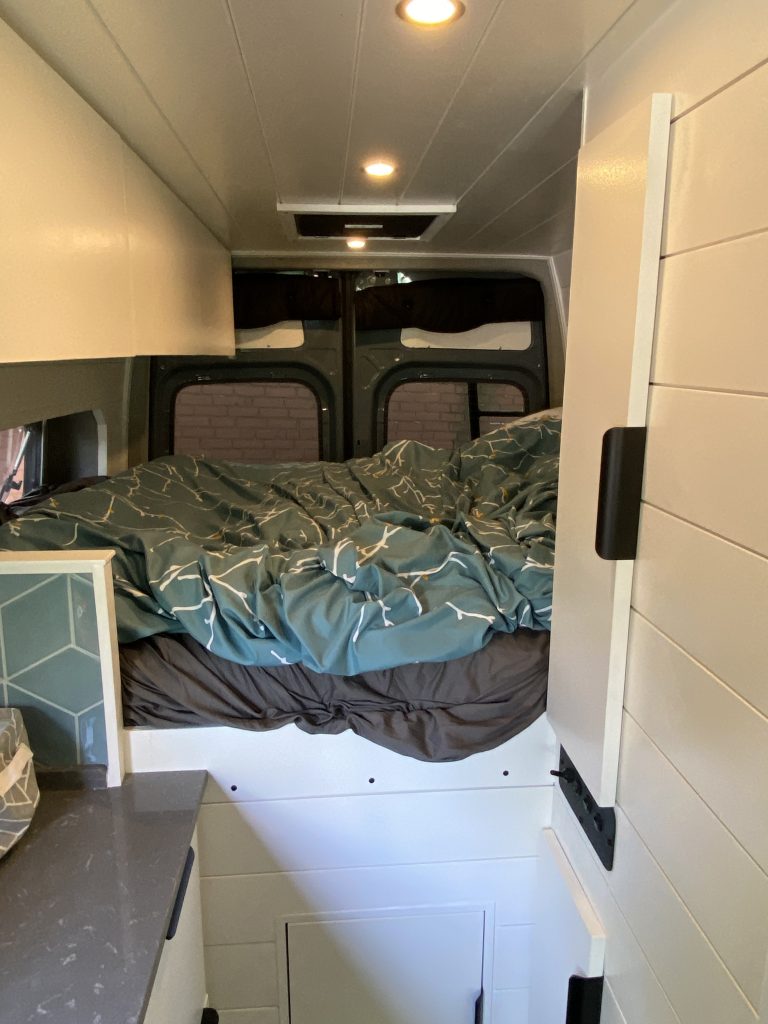
A Fixed Bed (Instead of a Convertible Bed)
In campervans, there are two main types of beds:
- A fixed bed that serves as a bed 100% of the time and has storage (called a “garage”) underneath.
- A convertible bed that you can make into a bed for sleeping. During the day, you can convert it into a seating area.
We chose a fixed bed:
Here is an example of a convertible bed:
The seating area converts into the only bed in the van.
There are two main reasons why we went with a fixed bed.
- Laziness: We are lazy. We don’t make our bed at home. Washing and putting new sheets on the bed is such a rig-a-ma-role. We did not want to have to do that every day so that we could both sleep and have a place to sit inside the van.
- Storage: Having all the space under the bed allowed us to not have to skimp on the water or power systems. It also provides us with a lot more storage space for outdoor gear. We can even fit our bikes under the bed.
After deciding on a fixed bed, the next question to answer was: Do we want to sleep front-to-back or side-to-side in the van?
Ultimately, we chose to install our bed side-to-side. The benefit of doing this is that you can maximize the living space within the van. Since a queen-sized bed is 60 inches wide and 80 inches long, we had 20 extra inches in the living space!
The downside of this decision was the cost. Since receiving the van, we also realize that we’ve sacrificed some comfort as well.
To sleep side-to-side, we needed to buy and install Flares from a company called Flarespace. These are essentially bump-outs that add an extra 6-9 inches to the length of the bed. Without this extra length, the bed would not have been long enough for us to stretch out.
In the next post, I’ll go into the full details on costs. For now, I’ll say that sleeping side to side to get 20 extra inches of living space was a $5,000 decision.
The other downside is that we sacrificed a bit of comfort. To sleep flat on our backs, we need to have both our heads and our feet inside the flares.
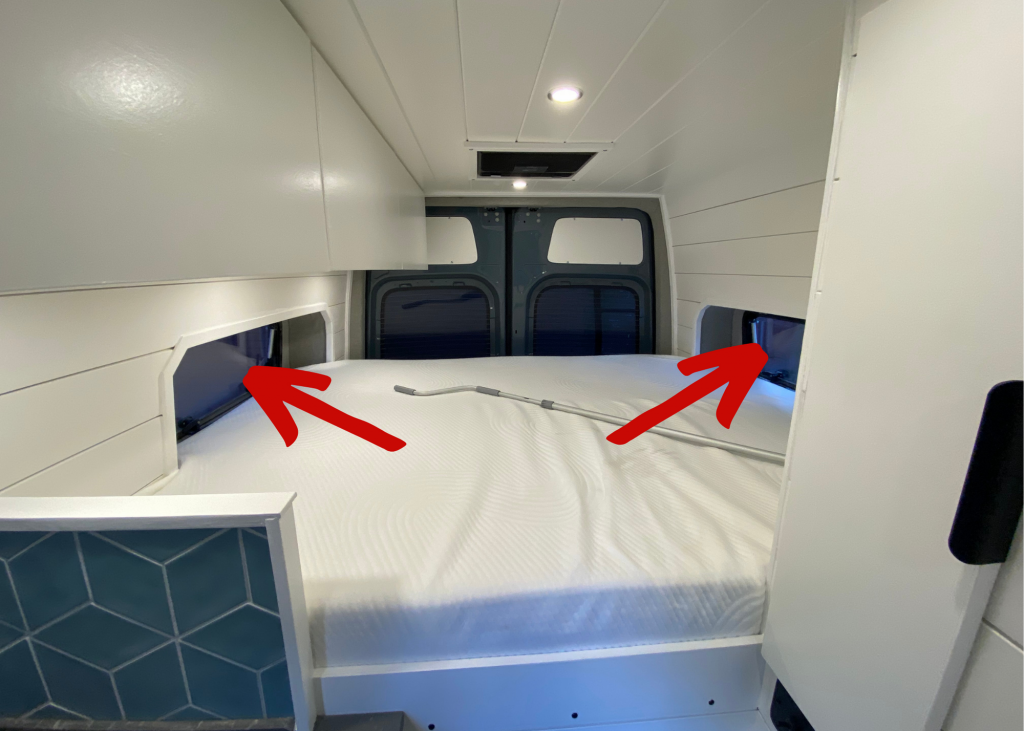
When we made this decision, we didn’t realize how small the space would actually be. So far, we’ve had a few head bumps. I’m sure this is something we’ll get used to over time. We’ll report back in a few months whether we’d recommend this (or if we’d do it again if we build out another van in the future).
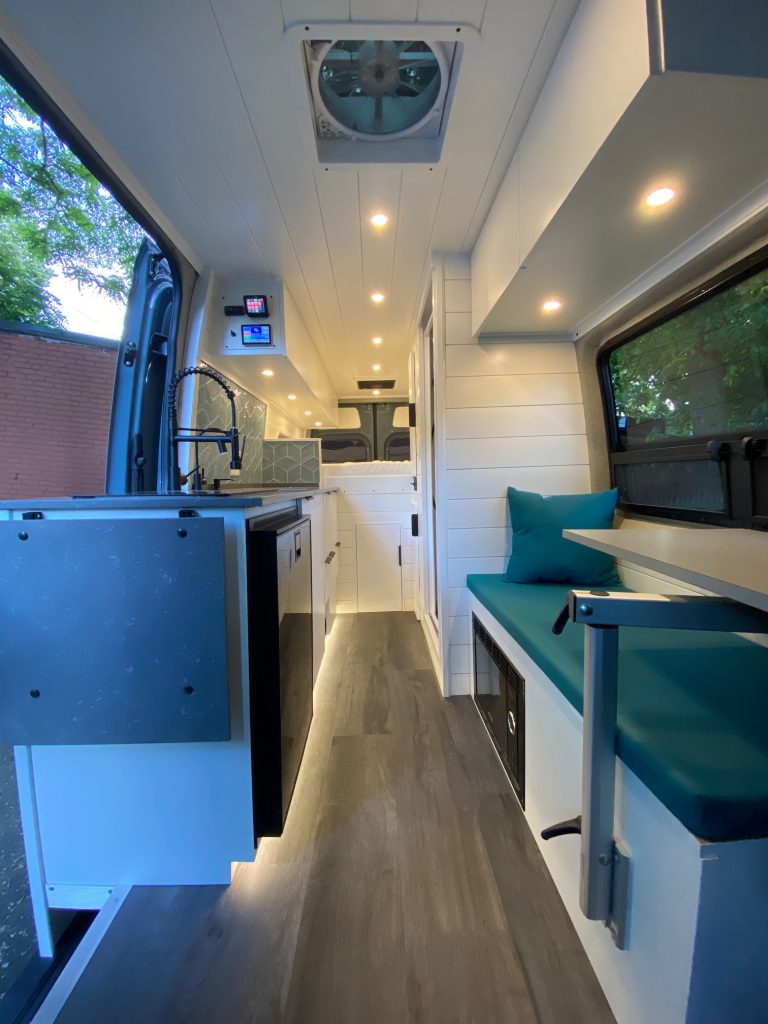
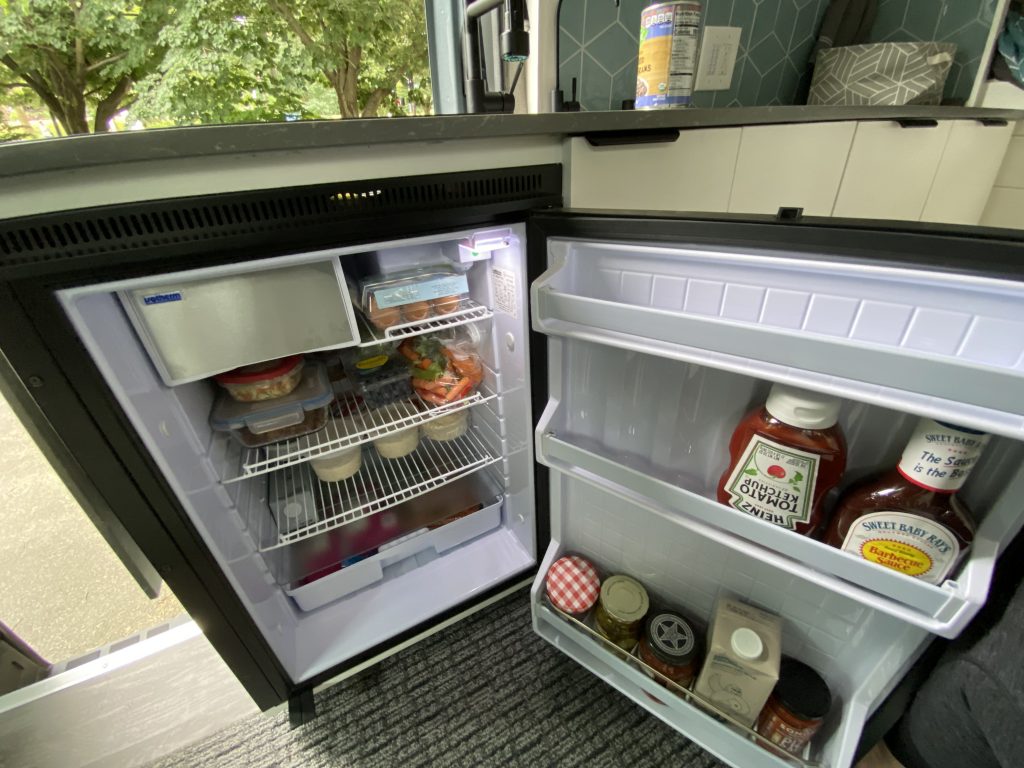
Seven-Foot Galley Kitchen
Since we did a side-to-side bed, this gave us enough space to do a SEVEN-FOOT galley kitchen on the passenger side of the vehicle.
I have a lot of food allergies and sensitivities, so it’s important for us to be able to cook most of our food when we travel. In fact, we actually hate eating out for every meal on vacation, so this is perfect.
In our kitchen, we have:
- A 2-burner induction cooktop
- A microwave (located under the bench seat)
- A 130-liter dorm-style fridge with a small freezer
- A sink with running hot and cold water (plus filtered drinking water)
- A flip-up countertop that gives us more workspace
- Upper and lower cabinets and a pull-out pantry for food and kitchen storage.
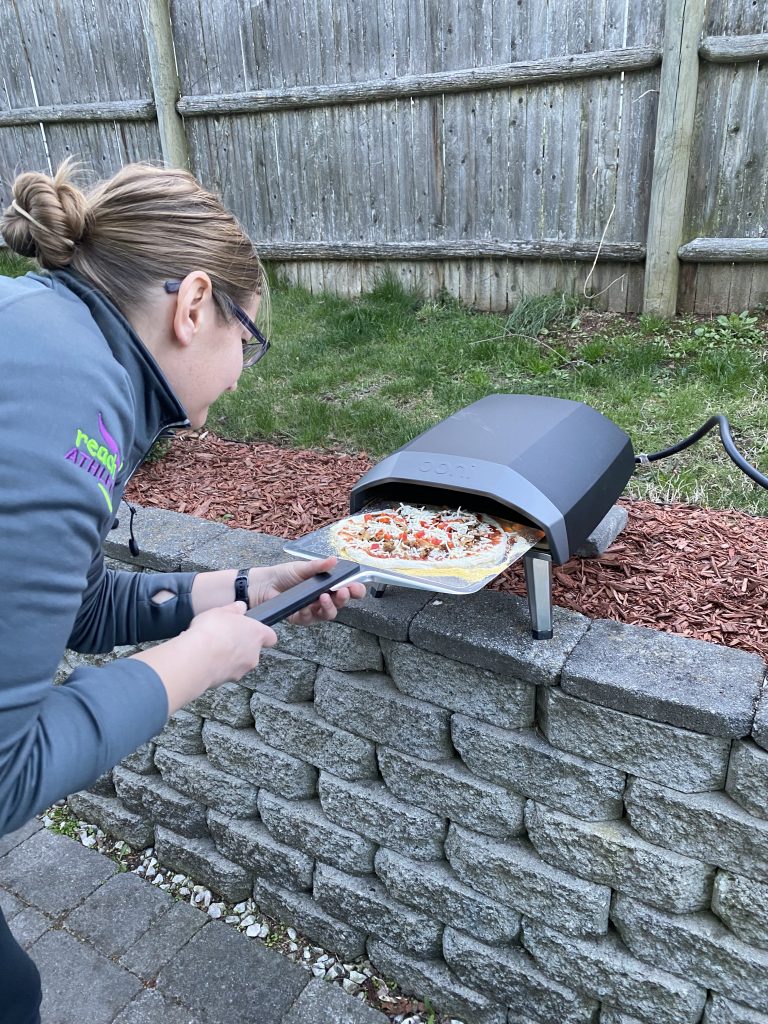
We also have a portable, outdoor pizza oven from Ooni that we bring with us. We store this in the garage space underneath the bed and take it out when we need it. We’ve made pizza a few times so far while traveling, and it’s worked really well. We recently learned that you can cook other things (e.g. burgers, steak, fish, cinnamon rolls, etc.) in these pizza ovens, and we’re excited to try it.
When we were designing the van, we were worried that we wouldn’t have enough space to store food. We didn’t want to go to a grocery store every few days. This has turned out not to be an issue.
When we took our week-long trip up to Vermont, we were able to pack all the food that we needed for the entire week into our fridge, pantry, and drawer. We even had extra room.
When we go on our 3-week trip to Canada later this month, we’ll find out just how much we can fit and how long we can go without restocking.
Permanent Bathroom Space with a Door
We decided to include a permanent bathroom in our campervan. In our bathroom, we have:
- A composting toilet
- A Shower with hot and cold water
- A sliding door that also serves as the shower curtain
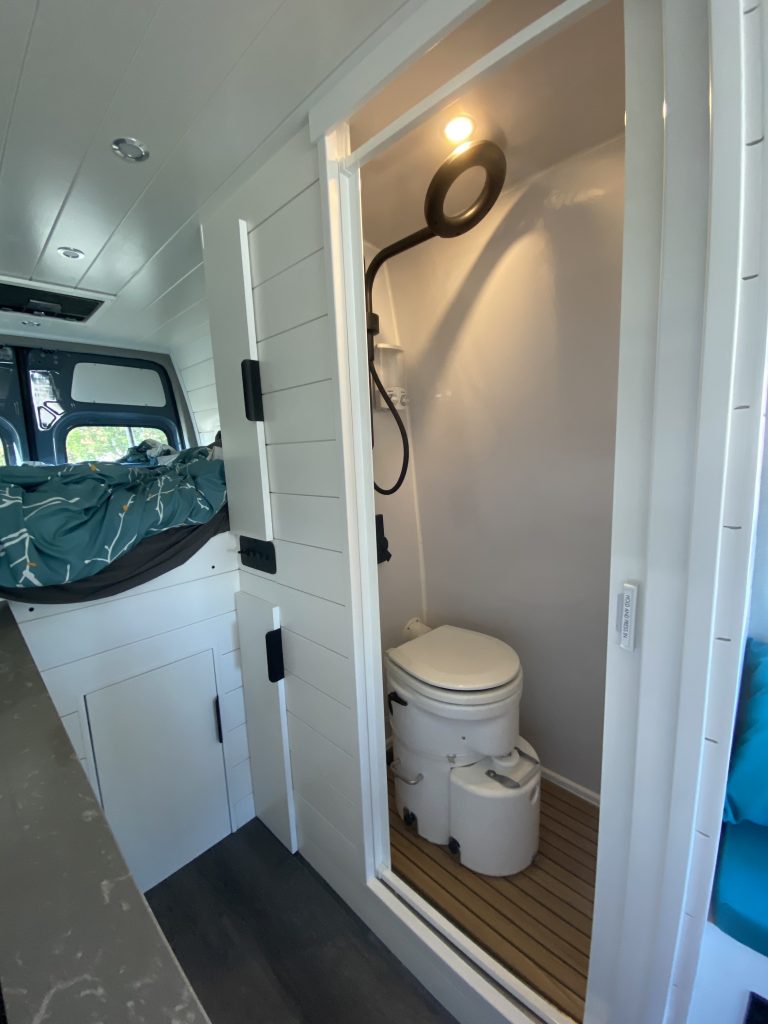
Many campervans don’t have a dedicated bathroom space because they want the van to feel more open. Some have a composting toilet in a bench or a pull-out drawer.
They might also have a temporary shower in a cabinet or bench that requires you to pull up a shower curtain and hang it from hooks on the ceiling.
Our decision came down to a few things:
- Privacy: We liked the idea of having a door we could close. Most vanlifers say you get comfortable doing your business in front of your partner. I’m not sure I’m there yet. We also want to be able to travel with friends, and this makes it more comfortable.
- Convenience: We’re lazy! We don’t want to have to set up, dry out, and tear down a shower every time we want to use it.
So far, we are happy with our decision. Corey has particularly liked being able to take a quick shower after disc golfing while we are still in the parking lot.
Seating Area for 4 People
While we will usually be traveling in our small family unit (2 adults and a dog), we knew that we might be visiting people on the road. In fact, we camped with my parents last weekend in their campervan, and it was nice to have space for my mom to come and sit in the van while I was cooking.
In our seating area, we have a bench that has storage underneath and a table that can swivel around to different areas based on where we are sitting. The driver’s and passenger’s seats also swivel to the back. This allows them to be an extension of the living space.
So far, we’ve usually had one person sit on the bench with the dog while the other person sits in one of the swivel seats.
Systems, Nuts, and Bolts
Behind the scenes (in the garage and inside the cabinets), there are systems that make everything work.
These systems include:
- A lithium-ion battery system that can power everything from the lights to the fridge to the air conditioner.
- A water system that includes a 35-gallon fresh water tank and storage for 32 gallons of gray water.
The other appliances that we haven’t mentioned so far include:
- An air conditioner that’s located in the ceiling above the bed
- Forced air heater
- Hot water heater
- Ceiling fan above the seating area and kitchen
- Cell Signal Booster
These things will allow us to travel for long periods of time, explore the world, and work from the van with the comforts of home that are important to us.
Reader Questions:
We got a lot of reader questions related to the layout and features of our campervan. If you have more questions for us, don’t hesitate to drop them in the comments of this post (or find us on social media). We’ll try to answer them all in a future post.
Question #1: How does the van stay ventilated when you sleep?
It’s very important for the van to stay ventilated so that we don’t get mold or mildew. We keep the van ventilated by having windows in both the head and foot of the bed.
One benefit of this is that we can turn on our Max Air fan (and set it to pull air out of the vehicle). If we have only the windows next to the bed open, it pulls air through the windows and provides a nice breeze.
If it’s cold, we don’t need to turn on the fan. We can simply crack a window.
Question #2: How do you manage wastewater?
One great thing about having a composting toilet is that we don’t need to have any tanks that hold black water (i.e. human waste).
The composting toilet separates liquids and solids. The “pee tank” is approximately 1.5 gallons. Depending on how much we use it, we need to dump it every few days. To dump the pee tank, we simply unhook it from the compost toilet. It has a lid and a handle to carry it, and we can dump it into the toilet of any bathroom.
We will only need to dump the composted solids once every few months. You can either put the compost into the trash or use it to fertilize non-food plants. Even if it’s composted, it still seems a bit weird to me to use composted human waste on plants. We’ll likely throw it away. Maybe, I’ll change my tune over time.
For the gray water from the sink and shower, we have two gray water tanks. One is below the sink and the other is in the garage behind the shower. We are able to dump these at any dump station. Or, because we use all biodegradable soaps, it’s often okay to drain the gray water in nature. It’s similar to washing dishes at your campsite and dumping the water basin in the woods behind the campsite.
Question 3: How much power do you have? Do you have to plug in for power?
We have a good amount of battery power. Unless you know about RVs, saying we have 540 amp-hours of lithium-ion batteries likely sounds like gibberish to you.
To put it in layman’s terms, we have enough battery power that we can easily run low-wattage items, like our lights, fan, water pump, and fridge.
We can also run high-wattage appliances like our:
- Air conditioner
- Induction cooktop
- Microwave
- Hot water heater
The important thing to note is that we can’t necessarily use all the high-wattage appliances at the same time. We can’t use more than 3,000 watts at any given moment, so we need to pay attention. This means that we can run two appliances at once time, but not three!
For example, our microwave uses about 1,200 watts and our induction cooktop uses about 900 watts for each burner (on medium heat). This means that we can use both burners at once. But, also using the microwave or the water heater at the same time would push the limits. But, we could use one burner or both burners on low (around 300-500 watts) and use the microwave at the same time.
We have a battery monitor that allows us to see the power draw in real-time which makes it easier for us to know what’s possible.
We also have a few ways that we can charge the batteries:
- Solar: We have 400 watts of solar panels on the roof of the van
- Alternator Charger: When we drive, the alternator not only charges the car battery but also the “house batteries”
- Shore Power: We do have an option of plugging into an outlet to charge the batteries. We typically don’t need to do this, but if we aren’t driving far (or it’s been very cloudy), we might top up the batteries at home before leaving on a trip.
Question #4: Can you bring more than two people in the van?
We only have two seats with seatbelts in the van. If we ever did bring a third person, they would need to ride on the bench and would not have a seatbelt. There are a few states that do not require seatbelts for people riding in the back, so it could be okay for certain trips.
We do have space for a 3rd person to sleep in the van if needed. If we swivel the driver’s seat to face the back, someone could theoretically sleep on the bench with their feet on the driver’s seat.
Because we don’t have kids, we opted to optimize our van for two people. If you’d like to build out a campervan that has additional seats, that is absolutely possible. There are many layouts that include a 3rd and even 4th seat and seatbelt.
Question #5: What kind of storage do you have for clothes, food, and gear?
In such a small space, we have a surprising amount of storage.
To store clothing:
- We each have a cabinet above the foot of our bed. The vast majority of our clothes fit here. For a weeklong trip, I even had extra space.
- We each have a small shelf above the seats in the cab where we can stuff sweatshirts, jackets, and hats.
- We store dirty laundry in a bag in the garage (under the bed). We can access it through the small door under the bed.
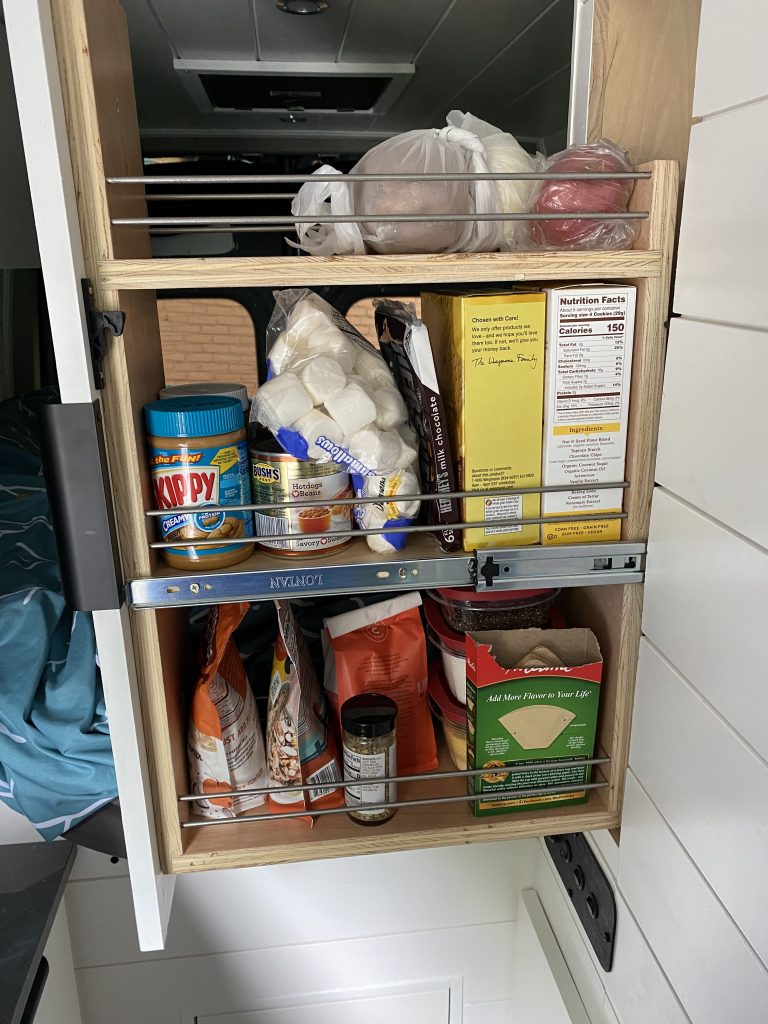
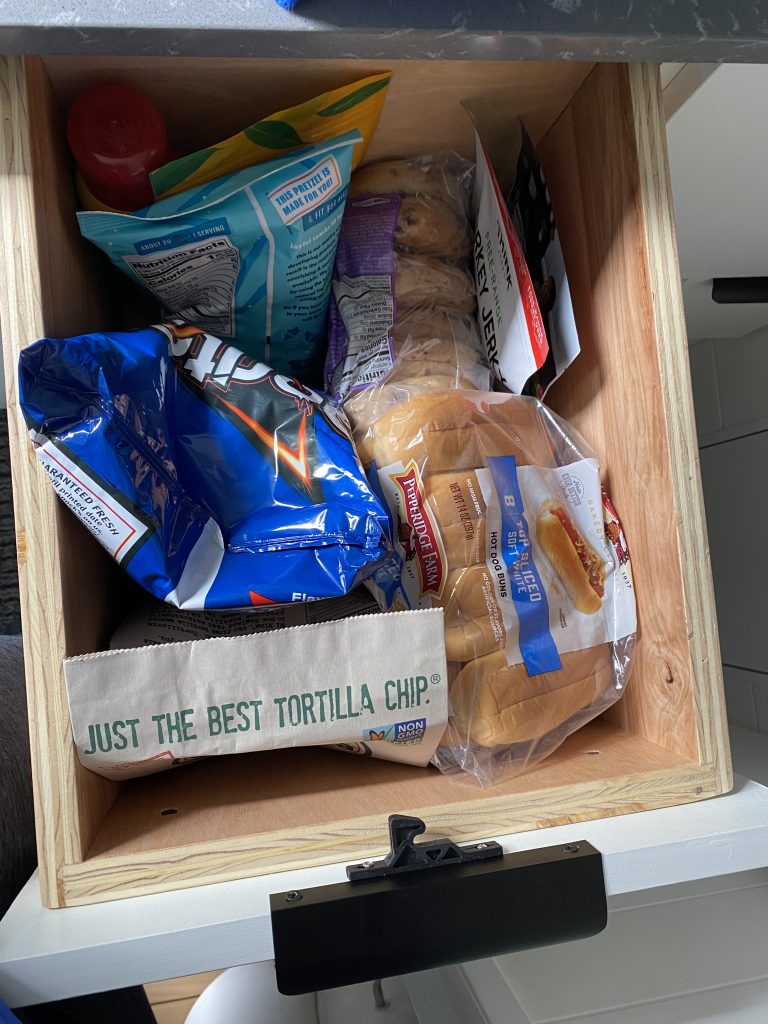
For food storage, we have:
- A pullout pantry in the wall between the shower and the bed.
- One drawer in the lower kitchen cabinets is reserved for food.
- The fridge, which can fit a ton of food.
- A fruit basket on the counter (that gets moved to the bed when we are driving).
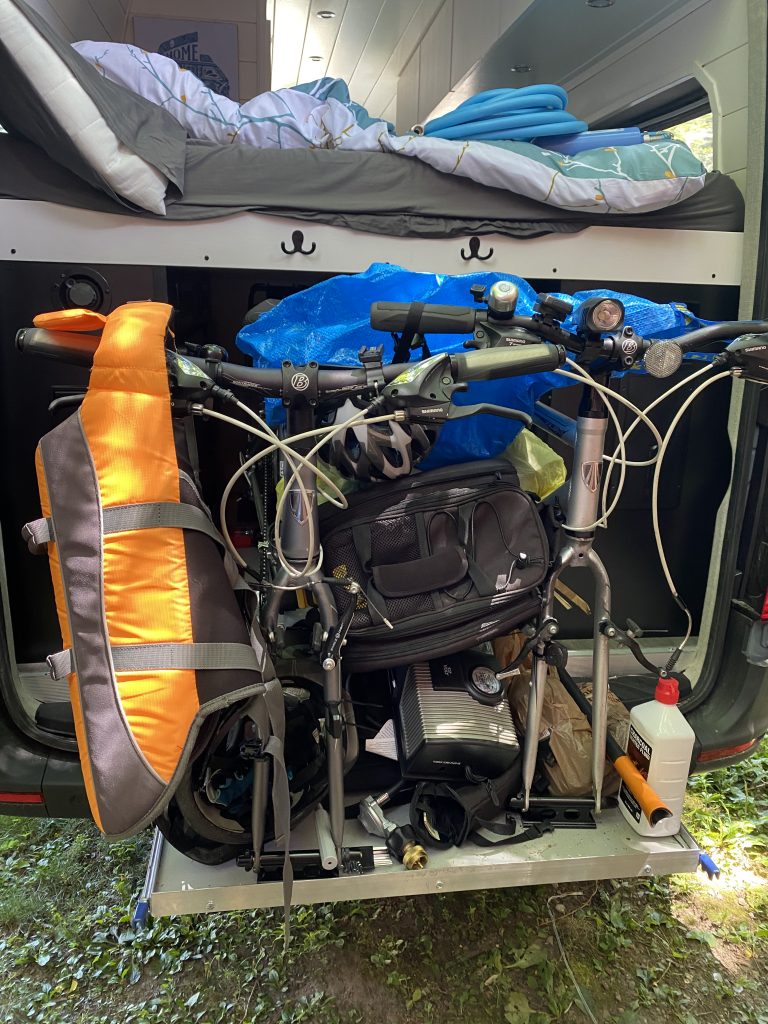
For gear (e.g. bikes, hammocks, pizza oven, hiking poles, disc golf bags, and board games), we have:
- The garage space under the bed
- The headliner shelf above the cab
- Storage inside the bench
- One upper cabinet section that we’ve designated for board games, our WeBoost, headlamps, and other small items.
Question #6: Since you have a dog, did you design anything with your pup in mind?
There were a few things that we designed with our dog in mind, including:
- Air conditioning, so that we could leave her in the van (if needed) on hot days.
- A queen-sized bed, so that it would be big enough that she could sleep in the bed with us.
- An outdoor shower/sprayer in case she gets dirty and we need to spray her off.
Her favorite spot so far is on the bench. We put a blanket or beach towel up there, and she loves it.
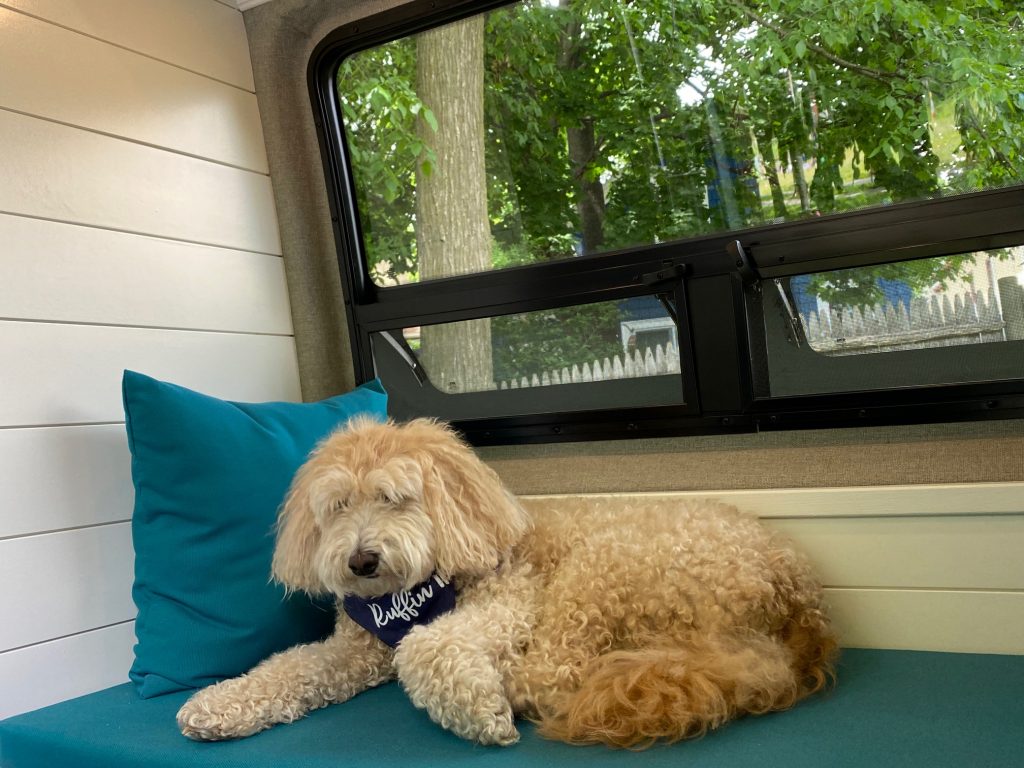
The main aspect of the build that wasn’t ideal for our dog is the height of the bed. We wanted the bed to be high enough so that we could fit our bikes underneath. This means that our dog can’t jump into the bed by herself. She needs one of us to lift her up there. She is only 30 pounds, so this is not a problem.
When designing such a small space, there are so many trade-offs to take into consideration.
We’re Excited to Hit the Road Again!
So far, we’ve had the opportunity to spend a week in Vermont and a long weekend on Cape Cod.
We’ve had a lot of fun so far! Plus, we’re getting more comfortable with all the systems and figuring out what we truly need to bring with us.
Now, we’re itching to hit the road on a longer trip! Luckily, it’s only a few more weeks before we hit the road for three weeks. We’ll explore New Brunswick, Prince Edward Island, and Nova Scotia. We’ve heard such great things about these Canadian Maritime Provinces, and we’re excited to visit friends and readers along the way.
If you want to keep track of our journey in real-time, we’ll be documenting it regularly on our Instagram account. We’ll also write more about it when we get back.
Lastly, stay tuned for more in our vanlife series! Part III will focus on the money. We’ll share more about the upfront and ongoing costs and how this impacts our FI timeline. We’ll also talk about why we decided to hire someone to build it for us (even though it was more expensive).
If you have any questions for us about our campervan or vanlife, drop them in the comments below! Hopefully, we’ll see you on our travels.


Great article on your very nice camper van build! My girlfriend and I restored an older Toyota RV. It turned into a build similar to a new build since we completely gutted it. Is your fridge a Truck Fridge TF130? It looks identical to ours and that’s what we used. We have been having some issues with it keeping cold enough. I wouldn’t have known except for we added a fridge thermometer with a blue zone that’s safe for food. This summer ours is typically outside of the blue zone. Not sure if we don’t have enough ventilation around the fridge, or if the unit has a problem. I’m curious to hear how your fridge has performed. Thank you!
Hey – ours is a 130-liter fridge too – I’m not sure of the brand – but I imagine it’s the same or very similar. We realized that we need to turn it up all the way cold for it to keep food cold enough (we also figured that out with a fridge thermometer), but if we do that it’s okay. The stuff right below the freezer sometimes freezes – so we try to keep the meat there and veggies down a bit lower.