A few weeks ago we wrote a post all about the layout and features of our non-budget campervan. The post was already chock full of information, so I decided to write a stand-alone blog post about the costs of the campervan and build.
We’ve already told you that we splurged quite a bit. We are happy with our decision for a few reasons. First, it will support the things that we value (travel, adventure, connection, etc.). Second, the campervan will be our adventure mobile for years to come.
Even so, it’s a little bit hard to admit how much we actually spent on the campervan.
Our Non-Budget Campervan Cost Breakdown
In this section, I’m going to tell you about the breakdown of costs into three categories:
- Vehicle
- Supplies
- Labor
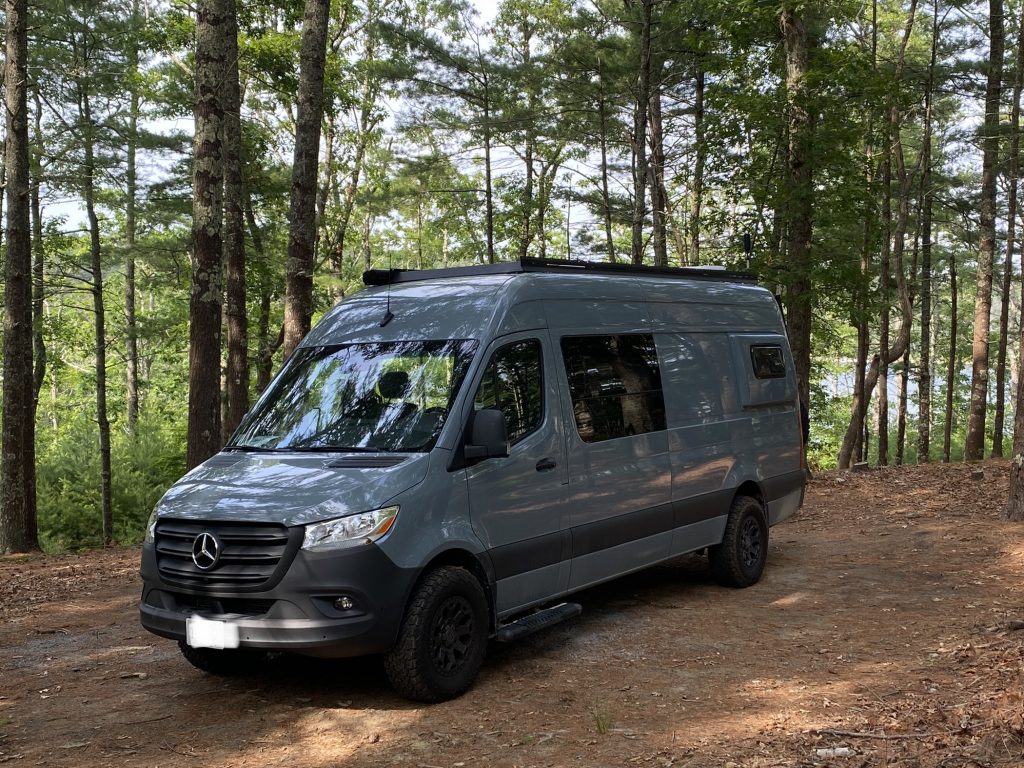
Vehicle: 2021 Mercedez-Benz Sprinter
As we shared in part I of our vanlife series, we decided to buy a Mercedez-Benz Sprinter van. This is the highest quality (and also most expensive) cargo van on the market. We chose to go with a Sprinter instead of a Ram Promaster or a Ford Transit because of the quality.
We watched countless Youtube videos and read countless articles about the differences. We learned that the other vans are more likely to have issues earlier than the Sprinter vans.
We also decided to buy a new Sprinter van rather than a used van for a few reasons. First, there are very few used Sprinter vans on the market these days. The vast majority of people buy them as work vans and use them until they die. We also saw that used cargo vans on the market were typically very well-used. It was virtually impossible to find a van that was lightly used. I think we saw one once, but we would have had to drive all the way to Virginia for it, and there was only one!
We also know that we’d be spending a significant amount of money to build out the van. We wanted the investment that we were putting into it to be well worth it. So, we decided we wanted to van to last as long as possible. This swayed us to buy a new van straight from the factory.
By buying it new, we had the opportunity to customize the van to get almost everything we wanted (and nothing we didn’t want). We were able to choose our interior and exterior colors. We got factory swivel seats (driver and passenger seats that swivel to the back of the vehicle to expand the living room of the van). We know that these are so much better than after-market swivel seats. We had the opportunity to customize the cameras and sensors to help with parking as well.
The only things we weren’t able to get were the larger screen and adaptive cruise control. Because of the microchip shortage last year, those were features that we would have had to wait an extra 3-4 months for. We opted to get the van earlier.
So, how much did we pay for a NEW 2021 Mercedes Sprinter Cargo Van with a 170-inch wheelbase (the medium-sized Sprinter van)?
Cost of the Van = $60,371.56
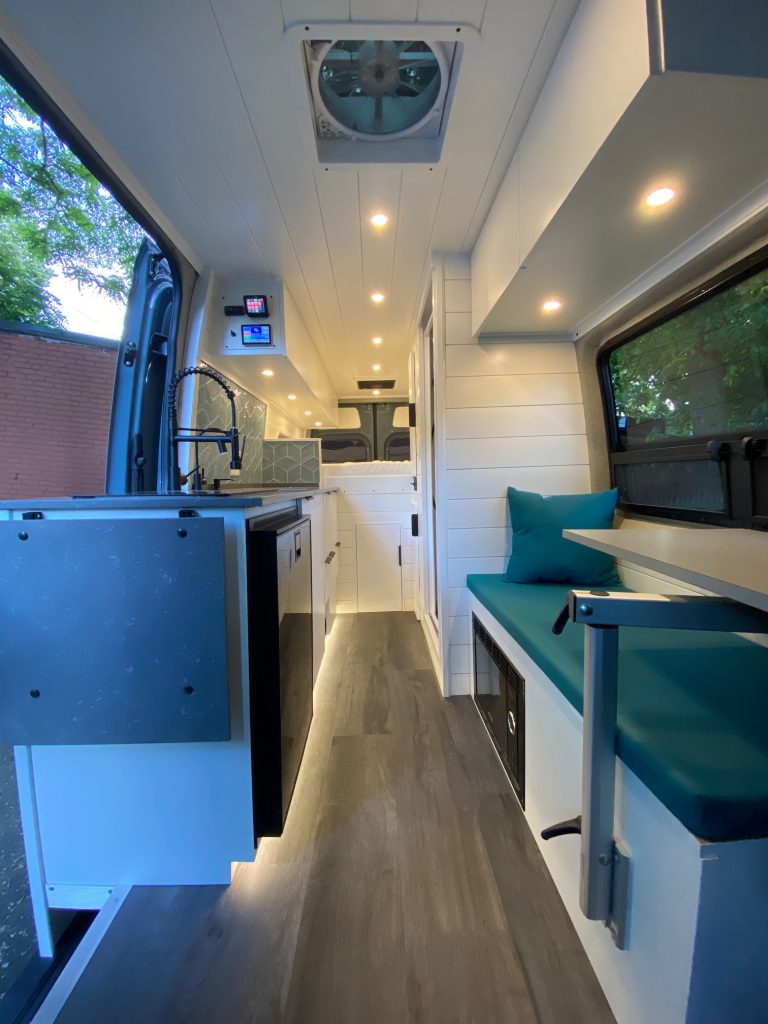
Materials/Supplies
Outfitting a campervan is like building a house. It is a tiny house, but it’s a house nonetheless. This means that we needed to buy all the same supplies that one would buy to build a house. Since it’s a tiny house on wheels and we plan to be off the grid most of the time, there were additional considerations. We needed to have the power and water systems be self-contained within the vehicle.
Here is the (not fully comprehensive) list of supplies that we bought to build out the campervan, broken out into categories:
Power, water, and ventilation systems:
- Lithium Ion Battery System
- Inverter Charter
- Power monitor and switches
- Fresh and gray water tanks
- A water pump
- A hot water heater
- Air conditioning unit
- Forced air heater
- Maxxair Fan
- Weboost Cell Signal Booster
Exterior:
- Upgraded Wheels and Tires
- Spare Tire Holder and Ladder
- Awning
- Roof Rack
- Solar Panels
- Exterior Lights
- Windows
- Running Boards (a step to help us get into the van)
- Side and back door bug screens
- Window covers (for insulation)
Bathroom:
- Composting toilet
- Shower pan
- Showerhead
- Shower door
Kitchen/Living space:
- Refrigerator
- Sink
- Faucet
- Water filtration system
- Induction Cooktop
- Microwave
- Quartz Countertops
- Tile for the backsplash
- Lagun Swivel Table
Bed System:
- Flares from Flarespace to provide extra width so that we could sleep side-to-side in the van. See part II of our campervan series to learn more about this decision.
- Mattress
And this doesn’t include any of the materials (wood, wiring, screws, insulation, fabric, etc.) to:
- Frame out the van
- Build the cabinets or the bed system
- Frame out and waterproof the shower
- Run the full electrical system
- Lay down the floor
- And more…
Plus, with inflation, many things ended up being a lot more expensive than we expected.
How much did we spend on materials for the campervan build?
Vanbuild Materials = $61,888.66
This means we spent slightly more on the build materials than we did to buy the van. We’ll talk more about this later in the post, but this was about $20-25K more than we expected to spend on materials.
Labor
We briefly considered doing the build ourselves, but we didn’t end up going in this direction. We realized that the amount of time it would take was unrealistic for us. This is especially true because Corey is still working full-time in a traditional job. Also, neither of us has any construction experience.
Because we wanted the van to be ready for us to use this summer, we decided to hire someone to build the van for us. We chose to work with Interstate Vans, a custom campervan company based in our home state of Massachusetts.
We’d been following this builder’s work on Instagram for a while and were impressed. So, we decided to set up a call with him.
We booked a conversation with him to learn about rates and discuss the options of either doing a partial build or the full build for us. After we learned that he typically charges $3,500/week for a van build, we wanted to understand the costs for the full build vs. a partial build.
We thought that perhaps we could do some of the interior stuff at the end which could potentially reduce the cost.
After the discussion, we realized that the things that we felt comfortable doing were the things that he would be doing in the last 2-3 weeks of the build. If he did the full build, it would take him 10 weeks (or the equivalent number of hours – 400). If he did a partial build, it would take him 8 weeks.
When we looked at the numbers for the build cost:
Full build (10 weeks) = $35,000
Partial build (8 weeks) = $28,000
Having him do a partial build would only save us $7,000. But, it would also add tremendous stress to our lives. So, we decided that $7,000 was worth it for our sanity and peace.
We decided to hire them to do the full build for us. So, how much did we pay for labor?
Labor Cost = $35,000
Total Cost of the Campervan and Conversion
So, you may have already done the math yourself. In case you didn’t, here it is:
- Van = $60,371.56
- Supplies = $61,888.66
- Labor = $35,000
- Total Cost of the Campervan + Conversion = $157,250.22
Reader Questions
Question #1: What were the biggest expenses?
Besides the van itself, these were the biggest expenses:
- Lithium Ion Batteries + Battery Package (from Battleborn) – $6,871.73
- Flares (Flarespace) – $5,000
- Suspension kit – $3,899
- Air Conditioning Unit (Dometic RTX 2000) – $3,328
- Tire Carrier and Ladder Combination (Owl Vans) – $2,200.13
There were a few other things that came into the $1-2K range, including the awning, fridge, quartz countertops, and heater.
Question #2: Did we need to increase the budget because of inflation?
Yes. We absolutely needed to increase the budget because of inflation. The appliances and supplies were more expensive. Shipping was more expensive. Construction materials were more expensive.
At a certain point, we realized that we needed to somewhat “let go” of our expectations on the pricing of the van. Materials ended up costing $20-25K more than we initially (and overly optimistically) expected.
We knew what we wanted in the van and that it would add a lot of value to our lives. We decided that increasing the budget was worth it.
Question #3: Were there things you did to save money?
We did splurge on a lot of things, but there are certainly places where we opted to save money.
Here are just a few:
- Heater: We decided to go with a basic forced-air heater for $1,500 even though the van builder suggested an ambient hydronic heating system that cost at least 4 times as much.
- Air conditioner: While the van builder recommended a more expensive AC unit that would be more than $5,000, we decided to go with one that was around $3,000.
- Backsplash: When I originally found a tile backsplash I liked, it was going to be over $1,000. So, I went back to the drawing board and found something similar for less than $200.
- Mattress: Instead of buying the mattress that was created by Flarespace to fit into the Flares which was around $1,000, we bought a 6-inch memory foam mattress for $170 and the van builder cut it to fit within the space.
When making decisions, we would consider how much value this would add to the experience. If spending more on something wouldn’t add significant value to the experience, we decided to go with something that cost less.
Question #4: How did you find someone to build out the van for you?
We knew there were a lot of custom campervan builders out there, and it was simply a matter of finding one that we wanted to work with within our local area.
In fact, when we did our campervan experiment last summer, the van we rented through Outdoorsy was actually owned by a van builder. Unfortunately, he lives up in New Hampshire, so we decided to look closer to home.
When we started my research, I remembered that I had corresponded with another van builder who was located in Massachusetts. So, I went back to Outdoorsy and looked him up. After following him on Instagram and being impressed by his work, we decided to set up a call.
After a single conversation, we were in. He did high-quality work and had a lot of strong recommendations.
Question #5: How long did the build take?
While the van build was originally set to take 10 weeks, we had a few setbacks. Some of the materials took longer than expected to produce and ship. Our van builder and one of his staff members both got COVID during the process.
The process ended up taking 4 months. Fortunately, the van builder only charged us for the agreed upon 10-weeks of man-hours, even though the work was done over the course of 16 weeks.
Question #6: How much did this purchase impact your FI timeline? And… was it worth it?
$157,250.22 is a lot of money. It definitely has an impact on our financial independence timeline.
When we originally decided to buy the campervan, we wrote a post about the purchase. In that post, we predicted that we’d spend about $135,000 on the campervan.
Based on our FI calculations at the time, we predicted that it would add about 10 months to our FI timeline (which was previously around 7 years). In the grand scheme of things, that felt like such a short time, so we decided to go for it.
In actuality, we spend $22,000 more than we expected to. So, I recently went back to see how much that increase affected our FI timeline. Instead of pushing back our FI timeline by 10 months, it pushed it back to 1 year.
Not too bad, actually.
Knowing that this van will support our ideal lifestyle in the years to come, lengthening our FI timeline by one year is a small “price” to pay. We know we will get tremendous satisfaction and joy from having this campervan in our lives.

Our plan has never been to race toward the FI finish line. We want to design lives we don’t want to retire from. We expect that our FI timeline will slow down as we design that life because there won’t be as much urgency to get to the destination.
We are confident that this is the right decision for us.
If you read this far, you may also be interested in our full van build, with a detailed list of the products we used.
Have you ever spent a significant amount of money on something and knew it was the right decision for you?


Nice van! It looks like we have similar color schemes. I’ve got a 32′ class C Winnebago. It came in lovely shades of brown and beige. I don’t know why they make these all so dark inside, but they do. I painted the cabinetry and trim white and the walls are a lovely shade of blue called Ocean Boulevard. Shades of teal, aquamarine, and turquoise are accents. I took out the dinette and replaced it with a home office. Hope to see you on the road some day!
How happy you are! have smooth roads! How much do you usually pay for the parking in a camping?
So far, camping is usually $15-30 per night. However, we’re planning to do some free dispersed camping on our trip out west. There’s not a lot of free camping locations on the East Coast of the US where we live.